Showing posts with label Hands On Geometry Ideas. Show all posts

Wednesday, February 20, 2013

Understanding the Concept of the Volume of a Rectangular Prism

Today I did an awesome activity with my 6th graders to help them to understand the concept of volume. Not only did the kids enjoy this lesson, but they also came up with some amazing answers to the questions that were asked. This was a great higher level thinking activity that I believe could be applied to other grades that you might teach.

(If you are interested in getting a copy of this lesson plan along with the prism template, please visit my TpT site to see if you may want to download it.)

First, students cut out the foldable pictured below. They are then instructed to tape the sides together to form a prism.


Next, I asked my students to tell me how many cubes they thought were inside of the whole prism. They got to work trying to figure this out. I had one student out of the 45 sixth graders that I teach come up with an excellent answer.
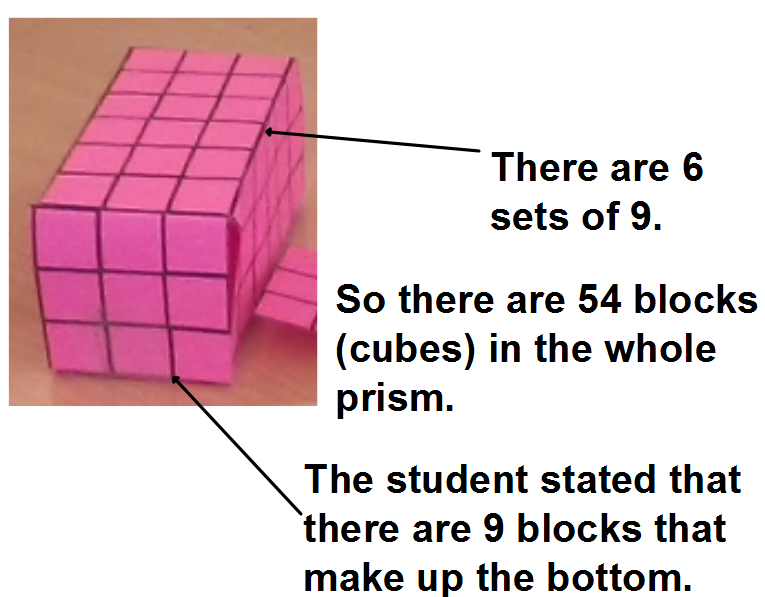

I had this student come up and explain this. He came to this conclusion with NO HELP from me! I love when this happens!!!!

The next question that I posed was what if two of these prisms were stacked up together? What would be the number of cubes inside? (Oh yeah, and I told the students they had to forget that the answer to the last question was 54 cubes and start the process from scratch.)


Here is one example of what they came up with. (We derived the formula together. As a class we determined that volume is equal to the area of the base (B) multiplied by the height.)

Then I had them situate the blocks so that they made a wider prism. Would they get the same volume? They had to prove it.


Here  is an example of what one student came up with.


Friday, January 25, 2013

A Great Way to Help Students Discover the Sum of the Interior Angles in Polygons!

Hello again, I thought I would share another great discovery lesson that worked really well! I completed this lesson Wednesday with my 7th grade students and it was very successful. In order to get my students to understand the concept of finding the missing angles of various polygons, I started with a short activity dealing with triangles. It is not a new idea, and I do not take credit for it, but it was a great starting point for this lesson. This lesson would be very easy for you to recreate on your own, however if you want the pre-made UBD Lesson Plan and all necessary templates, you can look for it at my TpT store at: http://www.teacherspayteachers.com/Product/Betta-Math-Discovery-Lesson-Finding-the-Sum-of-Interior-Angles-of-Polygons

Once the students have finished discovering that ALL triangles have three angles that add up to 180 degrees, they then investigate how many triangles are in each polygon. I created a quadrilateral, pentagon, hexagon, haxagon, heptagon, and octagon for them to investigate. They should arrive at teh conclusion that there is a pattern. The number of sides a polygon has minus 2 equals the number of triangles. They know that a triangle equals 180 degrees, so to figure out the sum of the interior angles, you just multiply the number of triangles by 180 degrees.
Students started with a random triangle that they cut out. They
labled and highlighted each angle.


Thursday, January 24, 2013

Common core Interactive Geometry Flipbook

Here are some pictures showing you how the Interactive Geometry Flipbook looks when completed. This is a student example. I have omitted the actual definitions because the students should be allowed to explore and compare the various figures to create a deeper understanding of these figures that will be used frequently to describe what they are learning during the Geometry Unit.

You can download this resource for free from my TpT site: http://www.teacherspayteachers.com/Store/Betta-Math


Students were exposed to a real angle that they could
manipulate. They were able to create their own
definition of this figure.
This page took a little time to complete, but gave them a line
that actually has arrow pieces that can be extended out
to show that a line goes on forever on a straight path in
both directions.
Students could clearly understand that the distinct
difference between a line and a line segment is that a
line segment has end points on both sides and will not
extend forever. It was neat to hear them come to this
conclusion without much direction from me.
Students thought about what a ray was by using
the interactive example of a ray.